Software Used:
- Clavister NetWall 13.00.02
- 3CX PBX V16
This FAQ describes the configuration of a Clavister NetWall for use with the 3CX Phone System.
Step 1: Confgure port-forwarding
Login to the webinterface of the Clavister NetWall.
- Go to “Objects -> Address Book” and click “Add -> IP4 Address“.
Name: PBX_3CX
IP: Address of the 3CX PBX

- Go to “Objects -> Services” and click “Add -> TCP/UDP Service“. See: https://www.3cx.com/docs/ports/ for actual port information
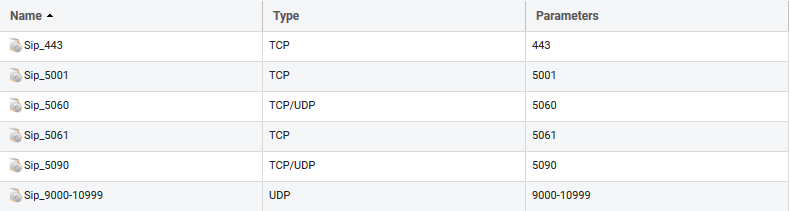
- Add service group for Sip_* service objects.

- Go to “Policies -> Main IP Ruleset” and click “Add -> IP Policy“.
Name: Publish_3CX
Action: Allow
Source if: WAN
Source IP: all-nets
Destination if: core
Destination IP: WAN_ip
Service: Sip_grp
Source Address Translation: None
Destination Address Translation: SAT
Address Action: Single IP
New IP Address: PBX_3CX
Port Action: None - Go to “Policies -> Main IP Ruleset” and click “Add -> IP Policy“.
Name: Outbound_3CX
Action: Allow
Source if: LAN
Source IP: PBX_3CX
Destination if: WAN
Destination IP: all-nets
Service: all_tcpudpicmp
Source Address Translation: SAT
Address Action: Single IP
New IP Address: WAN_ip
Port Action: None
Destination Address Translation: None
Step 2: Validating your setup
Log into your 3CX Management Console and go to “Dashboard” > “Firewall” to run the 3CX Firewall Checker to validate if your firewall is correctly configured for use with 3CX.
More information about the Firewall Checker can be found here.